- 更新日: 2013年7月27日
- CentOS & Linux
Web サーバー(Apache, httpd)のインストールと設定 〜 CentOS6
Apache(デーモン名は httpd)をインストールして、設定を行います。WEB サーバーですので、ウェブサイトの運用を行う場合などは重要な役割を果たします。
このエントリーは、CentOS 6.4 インストール~設定手順の目次 の一部です。
Apache(httpd)のインストールととりあえず動作確認
|
1 2 3 4 5 6 7 8 |
# yum -y install httpd # service httpd start httpd を起動中: [ OK ] # chkconfig httpd on # chkconfig --list httpd httpd 0:off 1:off 2:on 3:on 4:on 5:on 6:off |
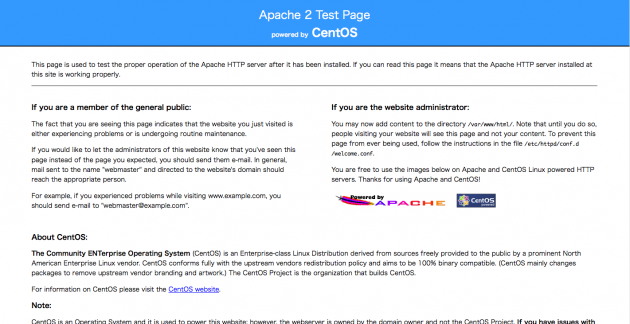
Apache が起動したら、サーバーのIPアドレスにブラウザからアクセスしてみましょう。iptables で ポート80を開けておく必要があります。Apache 2 Test Page のページが表示されたらとりあえずOK。何度見てもApacheのテストページが表示されるこの瞬間が大好きです、感動しますね。

Apache の設定ファイル httpd.conf を編集
続いて、Apache の設定ファイル httpd.conf を編集。
|
1 2 3 4 5 6 7 8 9 10 11 12 13 14 15 16 17 18 19 20 21 22 23 24 25 26 27 28 29 30 31 32 33 34 35 36 37 38 39 40 41 42 43 44 45 46 47 48 49 50 51 52 53 54 55 56 57 58 59 60 61 62 63 64 65 66 67 |
# vi /etc/httpd/conf/httpd.conf # 44行目付近 OS情報を表示しない ServerTokens Prod # 150行目付近からのLoadModule。使わないのをコメントアウト。 LoadModule auth_basic_module modules/mod_auth_basic.so LoadModule auth_digest_module modules/mod_auth_digest.so LoadModule authn_file_module modules/mod_authn_file.so ... # 263行目付近、自分のメールアドレスに変更。 #ServerAdmin root@localhost ServerAdmin hoge@gmail.com # 277行目、サーバー名の指定 #ServerName www.example.com:80 ServerName centos:80 # 286行目、UseCanonicalName を On に。 #UseCanonicalName Off UseCanonicalName On # 293行目付近、以下を確認。 DocumentRoot "/var/www/html" # 303行目付近、ファイルシステムの / (ルートディレクトリ)にはアクセス拒否。 <Directory /> Options FollowSymLinks AllowOverride None Order Deny,Allow Deny from all </Directory> # 318行目付近からの DocumentRoot 用の <Directory "/var/www/html"> ディレクティブを以下のようにする。 <Directory "/var/www/html"> # 332行目付近、Options ディレクティブで Indexes を削除してファイル一覧を表示しないように変更。 # Options Indexes FollowSymLinks Options FollowSymLinks AllowOverride None Order allow,deny Allow from all </Directory> # 537行目付近 OS情報を表示しないようにする ServerSignature Off # 555行目付近、Options ディレクティブで Indexes, MultiViews を削除して無効にする。 # Options Indexes MultiViews FollowSymLinks Options FollowSymLinks # 744行目付近、LanguagePriority で日本語を優先。 #LanguagePriority en ca cs da de el eo es et fr he hr it ja ko ltz nl nn no pl pt pt-BR ru sv zh-CN zh-TW LanguagePriority ja en ca cs da de el eo es et fr he hr it ko ltz nl nn no pl pt pt-BR ru sv zh-CN zh-TW # 760行目付近、文字化け防止のため Charset 指定をコメントアウト #AddDefaultCharset UTF-8 # 797行目付近、ScriptAlias の Directory 以外でも CGI を有効化。CGIとして認識する拡張子に、.rb .pl を追加。 # ※ただし、これだけではCGIは有効化しない。有効にしたい Directory で "Options ExecCGI" を指定すると有効になる。 #AddHandler cgi-script .cgi AddHandler cgi-script .cgi .rb .pl # 以下は、ファイル末尾に追加 # Trace Method を無効 TraceEnable Off |
以上で、とりあえず終了。
mod_expires 用のファイルを設定
mod_expires 用の設定ファイルを作成。本番環境では有効に、設定時は無効に(コメントアウト)します。とりあえず現在は設定中なので、キャッシュを無効にしておくために、全行をコメントアウトして無効にします。
|
1 2 3 4 5 6 7 8 9 10 11 12 13 14 15 16 17 18 19 20 |
# vi /etc/httpd/conf.d/mod_expires.conf # 本番環境では有効に、設定時は無効 # mod_expires でキャッシュを利用する #ExpiresActive On #ExpiresByType application/javascript "access plus 1 days" #ExpiresByType application/x-javascript "access plus 1 days" #ExpiresByType application/rss+xml "access plus 30 minutes" #ExpiresByType text/html "modification plus 15 minutes" #ExpiresByType text/javascript "access plus 1 days" #ExpiresByType text/css "access plus 1 days" #ExpiresByType image/jpeg "access plus 1 days" #ExpiresByType image/png "access plus 1 days" #ExpiresByType image/gif "access plus 1 days" #ExpiresByType image/x-icon "access plus 1 days" # ETagの生成をファイルの最終修正時刻、サイズからのみに限定 # http://www.inter-office.co.jp/contents/78/ を参照 #FileETag MTime Size |
設定ファイルをチェック後、httpd 再起動
Apache 設定ファイルのシンタックスをチェック。
|
1 2 3 4 5 6 7 8 9 10 |
# httpd -t Syntax OK # chkconfig httpd on # chkconfig --list httpd httpd 0:off 1:off 2:on 3:on 4:on 5:on 6:off # service httpd restart httpd を停止中: [ OK ] httpd を起動中: [ OK ] |
以上、Apache の設定ファイル編集の例です。私はこの後、名前ベースのバーチャルホストで Apache を運用する方針ですが、アクセス制御に関わる Deirectory ディレクティブの設定など Apache の設定は重要です。理解してしっかり設定を行います。バーチャルホストの設定については、Redmine を動かす際に行います。
- – 参考リンク –
- ◇Webサーバーについて◇初心者のためのLinuxサーバー構築講座(CentOS 自宅サーバー対応)☆お便利サーバー.com☆
- Directory、Files、Locationの各ディレクティブの処理される順番:ぴろにっき:So-netブログ
- (Apache)名前バーチャルホストを設定したらメインのドキュメントルートにアクセスできなくなった : 3流プログラマのメモ書き
- バーチャルホストの例 – Apache HTTP サーバ
- CentOS & Linux の関連記事
- Job for nginx.service failedのNginxエラー
- upstream sent too big header while reading response header from upstream(Nginx/Rails)
- Can’t get information about user clamav(clamdエラー)
- STDERR: Exception in thread “main” java.lang.InternalErrorエラー
- Linuxサーバー容量を確認するコマンドdf,duをマスターする!
- rmでファイル削除後にdf -hで容量が減らない時の対処(Linux)
- Apacheをローカルネットワークのみに公開にする
- logwatchからのメールが来ないと思ったら…
- Linuxサーバの負荷や使用率を調査するコマンドと手順
- Bashの脆弱性もう一件CVE-2014-7169に対するパッチ適用

 画像付き英語辞書 Imagict | 英単語をイメージで暗記


Leave Your Message!