- 更新日: 2013年8月21日
- CentOS & Linux
Nagios のインストールと設定 〜 CentOS6
オープンソースの統合監視システムである Nagios をインストールします。
このエントリーは、CentOS 6.4 インストール~設定手順の目次 の一部です。
Nagios 関連のパッケージをインストール
epel リポジトリから nagios とプラグインのパッケージをインストール。
|
1 2 3 |
# yum --enablerepo=epel -y install nagios nagios-plugins nagios-plugins-all |
描画に必要なライブラリをインストール。
|
1 2 3 |
# yum -y install gd-devel |
nagios からの連絡メールアドレスを設定
nagios からくるメールを受け取るメールアドレスを設定します。
|
1 2 3 4 5 6 7 8 9 10 11 12 13 14 15 16 |
# vi /etc/nagios/objects/contacts.cfg # Just one contact defined by default - the Nagios admin (that's you) # This contact definition inherits a lot of default values from the 'generic-contact' # template which is defined elsewhere. define contact{ contact_name nagiosadmin ; Short name of user use generic-contact ; Inherit default values from generic-contact template (defined above) alias Nagios Admin ; Full name of user # email nagios@localhost ; <<***** CHANGE THIS TO YOUR EMAIL ADDRESS ****** # ↓ email root@localhost } |
とりあえず、root 宛にメールを送るように変更しました。
日付表示を iso8601 に変更
日付表示に国際規格の iso8601 を設定。見やすいんで。
|
1 2 3 4 5 6 7 8 9 10 11 12 13 14 15 |
# vi /etc/nagios/nagios.cfg # DATE FORMAT OPTION # This option determines how short dates are displayed. Valid options # include: # us (MM-DD-YYYY HH:MM:SS) # euro (DD-MM-YYYY HH:MM:SS) # iso8601 (YYYY-MM-DD HH:MM:SS) # strict-iso8601 (YYYY-MM-DDTHH:MM:SS) # #date_format=us # ↓ date_format=iso8601 |
パスワード認証の設定と動作確認
nagios 管理ユーザーにパスワード認証をかけます。
|
1 2 3 4 5 6 |
# htpasswd /etc/nagios/passwd nagiosadmin New password: Re-type new password: Updating password for user nagiosadmin |
起動後、自動起動の設定。
|
1 2 3 4 |
# service nagios start # chkconfig nagios on |
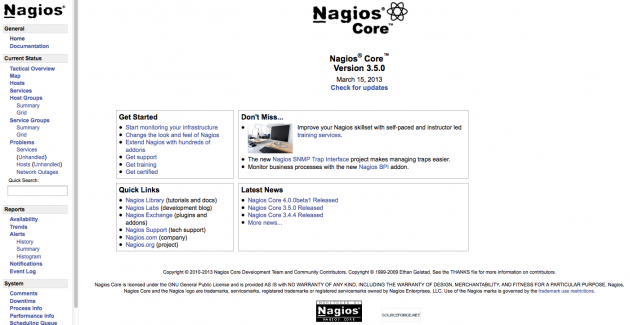
ここで、ブラウザから http://サーバー名/nagios/ にアクセスして Nagios のトップページが表示されることを確認します。左メニューから Services をクリックすると、監視対象として設定したサービスの状況を確認できます。

続いて、サービスなど監視対象を追加する設定を行います。今回は、メモリ空き状況, NTP, clamd(Clam AntiVirus), MySQL を監視対象として追加します。
メモリの監視を追加
メモリ監視用のプラグイン check_mem.pl を入れるために、Nagios プラグインをダウンロードします。check_mem.pl をコピーするだけで、Nagios プラグイン自体の configure, make, install は行いません。
wget して展開。
|
1 2 3 4 |
# wget "http://downloads.sourceforge.net/project/nagiosplug/nagiosplug/1.4.16/nagios-plugins-1.4.16.tar.gz" # tar zxvf nagios-plugins-1.4.16.tar.gz |
check_mem.pl を nagios のプラグインディレクトリにコピー。
|
1 2 3 |
# cp nagios-plugins-1.4.16/contrib/check_mem.pl /usr/lib/nagios/plugins/ |
必要なら check_mem.pl を編集
|
1 2 3 |
# vi /usr/lib/nagios/plugins/check_mem.pl |
実行権を付与
|
1 2 3 |
# chmod +x /usr/lib/nagios/plugins/check_mem.pl |
コマンド定義の設定ファイル commands.cfg を編集。定義を末尾に追加します。
|
1 2 3 4 5 6 7 8 9 |
# vi /etc/nagios/objects/commands.cfg # 末尾に追加 # 'check_mem' command definition define command{ command_name check_mem command_line $USER1$/check_mem.pl -f -w $ARG1$ -c $ARG2$ } |
監視サービス定義の設定ファイル localhost.cfg を編集。定義を末尾に追加します。
|
1 2 3 4 5 6 7 8 9 10 11 12 |
# vi /etc/nagios/objects/localhost.cfg # 末尾に追加 # Define a service to check the memory status on the local machine. define service{ use generic-service host_name localhost service_description Memory Free # 空きメモリ容量が残り20%で警告、10%で異常と設定する check_command check_mem!20!10 } |
Nagios 再起動。
|
1 2 3 |
# service nagios restart |
NTP の監視を追加
commands.cfg, localhost.cfg の末尾に設定を追加します。
|
1 2 3 4 5 6 7 8 9 |
# vi /etc/nagios/objects/commands.cfg # 末尾に追加 # 'check_ntp' command definition define command{ command_name check_ntp command_line $USER1$/check_ntp -H $ARG1$ -w $ARG2$ -c $ARG3$ } |
|
1 2 3 4 5 6 7 8 9 10 11 12 |
# vi /etc/nagios/objects/localhost.cfg # 末尾に追加 # Define a service to check ntp on the local machine. define service{ use generic-service host_name localhost service_description NTP # 外部NTPサーバーと1秒ずれたら警告、2秒ずれたら異常 check_command check_ntp!210.173.160.27!1!2 } |
Nagios 再起動
|
1 2 3 |
# service nagios restart |
clamd(Clam AntiVirus)の監視を追加
commands.cfg, localhost.cfg の末尾に設定を追加します。
|
1 2 3 4 5 6 7 8 9 |
# vi /etc/nagios/objects/commands.cfg # 末尾に追加 # 'check_clamd' command definition define command{ command_name check_clamd command_line $USER1$/check_clamd -H $ARG1$ } |
|
1 2 3 4 5 6 7 8 9 10 11 12 |
# vi /etc/nagios/objects/localhost.cfg # 末尾に追加 # Define a service to check clamd on the local machine. define service{ use generic-service host_name localhost service_description clamd # check_clamd! 以降は /etc/clamd.conf で指定してある clamd.sock のパスを記述 check_command check_clamd!/var/run/clamav/clamd.sock } |
Nagios 再起動
|
1 2 3 |
# service nagios restart |
MySQL の監視を追加
commands.cfg, localhost.cfg の末尾に設定を追加します。
|
1 2 3 4 5 6 7 8 9 |
# vi /etc/nagios/objects/commands.cfg # 末尾に追加 # 'check_mysql' command definition define command{ command_name check_mysql command_line $USER1$/check_mysql -H $HOSTADDRESS$ -u $ARG1$ -p $ARG2$ } |
|
1 2 3 4 5 6 7 8 9 10 11 12 |
# vi /etc/nagios/objects/localhost.cfg # 末尾に追加 # Define a service to check mysql on the local machine. define service{ use generic-service host_name localhost service_description MySQL # passwordはMySQLのrootユーザーのパスワード check_command check_mysql!root!password } |
Nagios 再起動。
|
1 2 3 |
# service nagios restart |
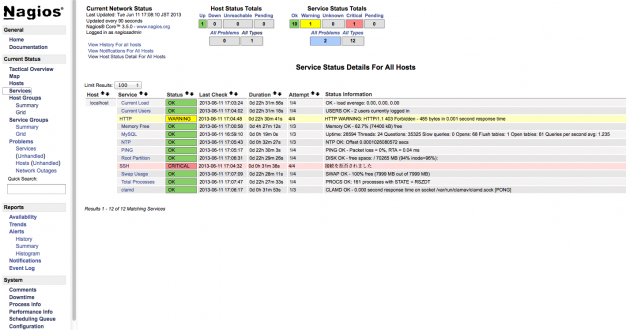
ここまで設定をし終えたら、再度ブラウザから http://サーバー名/nagios/ にアクセスして Nagios のトップページが表示されることを確認します。左メニューから Services をクリックすると、監視対象として設定したサービスの状況を確認できます。

SSH の CRITICAL エラーへの対処
SSH で CRITICAL, HTTP で WARNING のエラーが出ていますので対処します。
まずSSHのエラーから対処。check_ssh プラグインで SSH 接続のテストを行なってみます。-t 2 は2秒以内に接続できなかったらエラーを返すオプション。
|
1 2 3 4 |
# /usr/lib/nagios/plugins/check_ssh -t 2 192.168.1.2 接続を拒否されました |
SSH のポート番号を変更していたのを思い出しまして、ポートを指定してテスト。
|
1 2 3 4 |
# /usr/lib/nagios/plugins/check_ssh -t 2 -p 60022 192.168.1.2 SSH OK - OpenSSH_5.3 (protocol 2.0) | time=0.010591s;;;0.000000;2.000000 |
ポート番号を変更しているのが理由であったため、コマンド定義の設定ファイルを編集しました。check_ssh コマンドの定義に SSH 用のポート番号のオプションを付加する。今回の環境では SSH のポート番号は60022。
|
1 2 3 4 5 6 7 8 9 10 11 12 |
# vi /etc/nagios/objects/localhost.cfg define service{ use local-service ; Name of service template to use host_name localhost service_description SSH #check_command check_ssh check_command check_ssh! -p 60022 #notifications_enabled 0 notifications_enabled 1 } |
|
1 2 3 |
# service nagios restart |
以上で、SSH の CRITICAL エラーはなくなりました。
HTTP の WARNING エラーへの対処
続いて HTTP のエラー対処。Nagios の check_http はデフォルトで /var/www/html/index.html をチェックするそうだ。なので、テスト用に /var/www/html/index.html を作る。
|
1 2 3 4 5 6 7 8 |
# vi /var/www/html/index.html <html> <body> Nagios 用テスト </body> </html> |
|
1 2 3 |
# service nagios restart |
うーん、解決しません。Apache で Virtual Host を設定しているからだろうか。
check_http をコマンドから使って試してみる。
|
1 2 3 4 5 6 7 8 |
# /usr/lib/nagios/plugins/check_http -H 127.0.0.1 HTTP WARNING: HTTP/1.1 403 Forbidden - 485 bytes in 0.001 second response time |time=0.000582s;;;0.000000 size=485B;;;0 # /usr/lib/nagios/plugins/check_http -H localhost HTTP WARNING: HTTP/1.1 403 Forbidden - 485 bytes in 0.001 second response time |time=0.000864s;;;0.000000 size=485B;;;0 # /usr/lib/nagios/plugins/check_http -H localhost.centos HTTP OK: HTTP/1.1 200 OK - 286 bytes in 0.001 second response time |time=0.000908s;;;0.000000 size=286B;;;0 |
やはり、VirtualHost の設定のせいみたいでした、VirtualHost で設定してある SeverName, localhost.centos を -H のホスト名オプションに指定してやったら「HTTP OK: HTTP/1.1 200 OK」が返ってきました。したがって以下のように localhost.cfg を編集。
|
1 2 3 4 5 6 7 8 9 10 11 12 13 |
# vi /etc/nagios/objects/localhost.cfg define service{ use local-service ; Name of service template to use host_name localhost service_description HTTP #check_command check_http check_command check_http! -H localhost.centos #notifications_enabled 0 notifications_enabled 1 } |
|
1 2 3 |
# service nagios restart |
ちなみに、localhost.centos を ServerName とする VirtualHost の DocumentRoot を /var/www/html/ に設定しているので、/var/www/html/index.html は残しておかなければなりません。
以上で、エラーが消えたので作業を終了。
- – 参考リンク –
- 自宅サーバーを24時間自動監視(Nagios)
- 統合監視システム構築(Nagios) – CentOSで自宅サーバー構築
- Amazon Linux on EC2へnagiosをインストールしたときのハマりポイント – プログラマとSEのあいだ
- CentOS & Linux の関連記事
- Job for nginx.service failedのNginxエラー
- upstream sent too big header while reading response header from upstream(Nginx/Rails)
- Can’t get information about user clamav(clamdエラー)
- STDERR: Exception in thread “main” java.lang.InternalErrorエラー
- Linuxサーバー容量を確認するコマンドdf,duをマスターする!
- rmでファイル削除後にdf -hで容量が減らない時の対処(Linux)
- Apacheをローカルネットワークのみに公開にする
- logwatchからのメールが来ないと思ったら…
- Linuxサーバの負荷や使用率を調査するコマンドと手順
- Bashの脆弱性もう一件CVE-2014-7169に対するパッチ適用

 画像付き英語辞書 Imagict | 英単語をイメージで暗記


Leave Your Message!